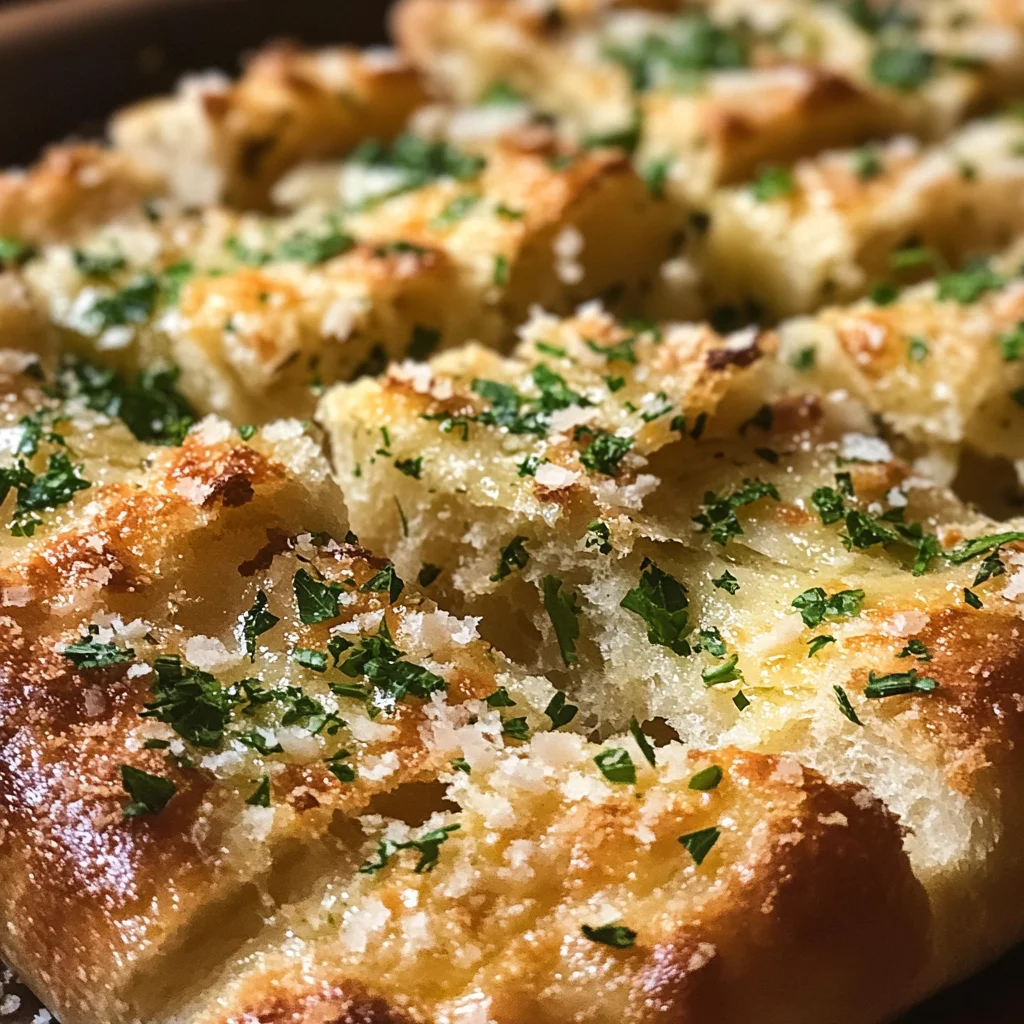
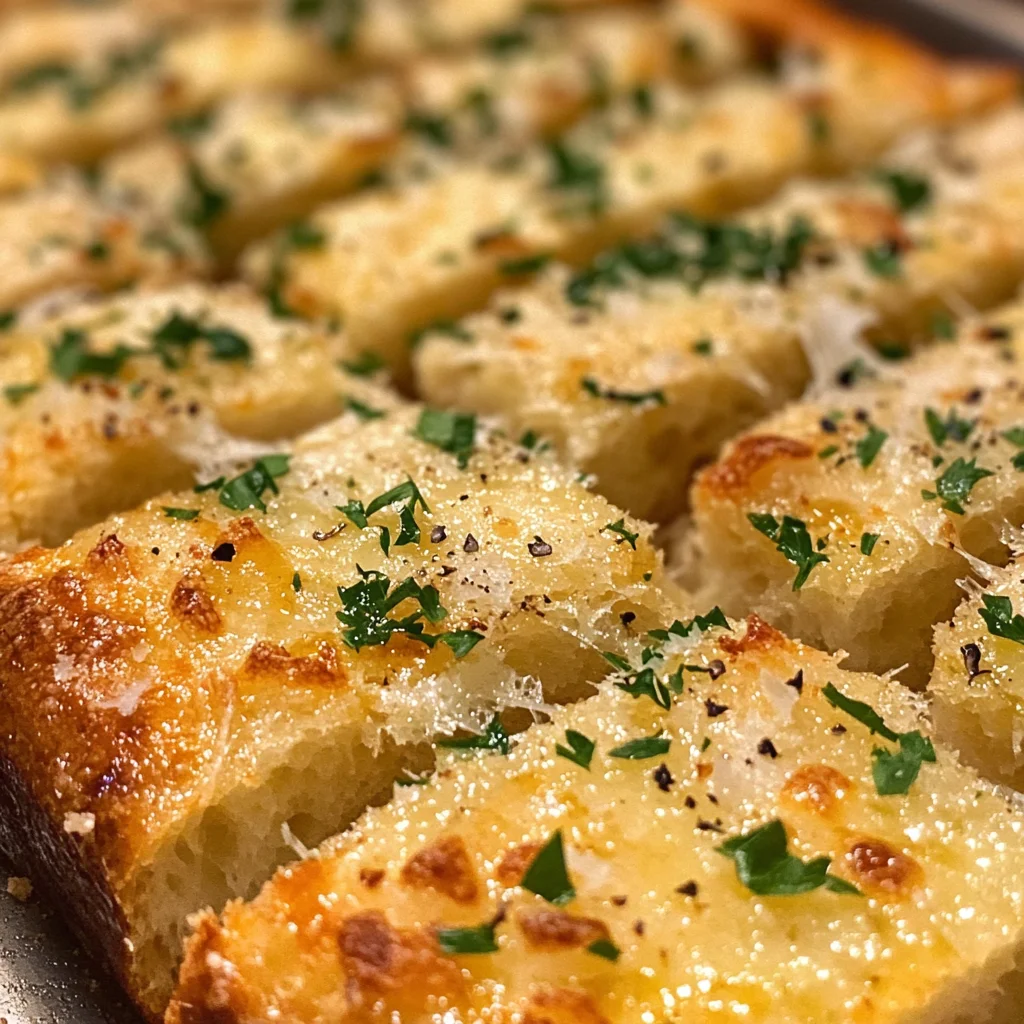
I’ve enjoyed many versions of garlic bread, but the addition of focaccia makes it even more special. This recipe for Classic Garlic Bread Focaccia takes the traditional flavors you love and adds a fluffy, airy texture that’s hard to resist. After a lot of tweaking, I found the perfect balance of garlic and butter flavor that pairs beautifully with the bread. In this article, you’ll find a detailed guide on how to make your own delicious batch.
Why You’ll Love This Recipe
- Fluffy Texture — The dough rises beautifully, creating a light and airy focaccia that’s perfect for soaking up all that garlicky goodness.
- Herb-Infused Flavor — Fresh parsley and garlic combine for a fragrant finish that elevates any meal or snack.
- Versatile Serving Options — Whether as a side dish or an appetizer, this focaccia complements pasta, salads, and more.
- Customizable Toppings — Feel free to add your favorite toppings like cheese or olives; the base recipe is flexible.
- Easy to Make — With straightforward steps, even beginner bakers can achieve impressive results without stress.

Ingredients You’ll Need
Main Ingredients:
* Warm water: 2 cups — Activates yeast for proper rising.
* Active dry yeast: 2 1/4 tsp — Essential for leavening the dough.
* Granulated sugar: 1 tsp — Feeds the yeast for better fermentation.
* All-purpose flour: 5 cups — Provides structure to your dough.
* Kosher salt: 1 1/2 tbsp — Enhances flavor throughout the bread.
* Extra-virgin olive oil: 1/4 cup — Adds richness and moisture to the bread.
* Extra olive oil: For drizzling — Helps create a crispy crust during baking.
* Flaky sea salt: Several pinches — Added before baking for extra flavor on top.
* Chopped flat-leaf parsley: For garnish — Brings freshness and color to your dish.
* Freshly grated parmigiano reggiano cheese: To taste — Adds depth with its savory notes.
* Salted butter: 4 tbsp — Melts into the garlic mixture for rich flavor infusion.
* Garlic cloves (minced or pressed): 4 cloves — The star ingredient in this recipe.
Smart Substitutions:
* Instead of all-purpose flour: Use bread flour — It will create an even chewier texture due to higher protein content.
* Instead of fresh parsley: Use dried Italian herbs — It will have less vibrant color but still provide good flavor.
Pro Tip: Look for high-quality extra-virgin olive oil; it can greatly enhance the taste of your focaccia.
How to Make Classic Garlic Bread Focaccia
Quick Prep Checklist:
* Measure out warm water (not hot).
* Prepare your baking sheet by greasing it with olive oil.
Step 1: Activate Yeast
In a bowl, combine warm water with sugar and yeast. Stir gently and let it sit until foamy, about 5–10 minutes. You want it bubbly; if not, your yeast might be inactive.
Tip: Always check expiration dates on yeast packets before use; old yeast won’t rise properly.
Step 2: Mix Dry Ingredients
In a separate large bowl, whisk together flour and kosher salt. This ensures even distribution of salt throughout your dough.
Watch For: The mixture should be lump-free and well combined before adding wet ingredients.
Step 3: Combine Wet and Dry Ingredients
Once activated, pour the yeast mixture into the flour mixture along with olive oil. Stir until no dry flour remains visible; it will form a sticky dough.
You’ll Know It’s Ready When: The dough pulls away from the sides of the bowl but remains tacky to touch.
Step 4: First Rise
Cover the bowl with plastic wrap or a clean kitchen towel. Allow it to rise in a warm place until doubled in size—about 1 hour is typical during warmer months.
Be mindful not to rush this step; under-proofed dough leads to dense bread.
Step 5: Shape & Bake
After rising, punch down the dough gently on a floured surface to release air bubbles. Then spread it onto your prepared baking sheet using oiled fingers. Dimple it using your fingertips and drizzle more olive oil on top before sprinkling flaky sea salt over everything. Bake until golden brown at around 425°F (220°C) for about 20–25 minutes.
This last step ensures you get that crispy exterior while retaining softness inside.
✅ Perfect Results Checklist:
* Golden brown crust on top
* Soft but chewy inside when torn apart
* Aroma of garlic wafting through your kitchen
Expert Tips & Variations
3 Pro Tips:
* Preheat Your Oven Properly: Ensure your oven is fully preheated before placing in your focaccia; this helps maintain consistent heat during baking resulting in better rise and crust formation.
-
Use Fresh Garlic Whenever Possible: Freshly minced garlic infuses deeper flavors compared to pre-minced options available at stores.
-
Let It Cool Before Serving: Allowing it some time off heat lets flavors settle while ensuring you don’t burn yourself when slicing into it later!
3 Variations to Try:
* Cheesy Garlic Variation: Add shredded mozzarella cheese directly into the dough for cheesy pockets within each slice after baking!
-
Olive Tapenade Focaccia: Spread some store-bought olive tapenade on top before adding garlic—adds Mediterranean flair!
-
Herb-Infused Oil Version: Infuse olive oil with rosemary or thyme beforehand then use this herbed oil instead during preparation steps—great aromatics!
Common Mistakes to Avoid
Mistake #1: Not Checking Yeast Freshness
When yeast fails to activate, you’ll end up with dense bread instead of fluffy focaccia. Using expired yeast means no rising action occurs because there are fewer active organisms available for fermentation. Always test freshness by proofing first before mixing into other ingredients.
Mistake #2: Skipping Rest Time After Mixing
Skipping proper resting time may result in tough bread lacking needed airiness—it simply won’t develop flavors correctly either! Rest periods allow gluten development which contributes significantly towards texture improvement across loaves baked afterward too!
Mistake #3: Overloading Toppings
Too many toppings added at once can lead soggy sections where moisture accumulates during baking instead of crispness forming overall across surfaces baked evenly! Stick primarily towards minimalistic approach focusing primarily upon standout ingredients rather than excessive variety spread thin across entire batch ultimately reducing impact yielded overall too!
Storage & Reheating
Room Temperature: Keep uneaten portions covered at room temperature for up to two days maximum without drying out rapidly afterwards either!
Refrigerator: Store leftovers sealed tightly in an airtight container where they remain fresh three additional days maximum easily accessible whenever needed thereafter too!
Freezer: Wrap tightly in plastic or foil then place within freezer-safe bag up thirty days maximum without compromising taste quality overall throughout duration frozen itself either!
Reheating:
* Oven: Reheat at about 350°F (175°C) for approximately ten minutes restoring optimal warmth alongside slight crust crispness again!
* Microwave: Use medium power level heating intervals every thirty seconds checking regularly aiming retain moisture levels balancing against risk dryness occurring gradually over time however!
* Stovetop:* Heat non-stick skillet over low flame covering lid retaining moisture preventing completely dried-out bites achieving optimal enjoyment factor still intact moving forward always after being reheated back again!
Frequently Asked Questions
Can I make this ahead of time?
Yes! You can prepare everything up until shaping then refrigerate overnight—let sit at room temperature prior bringing back towards final bake phase later next day easily too!
What type of flour works best?
All-purpose flour is ideal here since it’s versatile allowing flexibility within recipes yielding great results universally despite variations sought elsewhere potentially!
How do I know when my focaccia is done?
It’s ready once there’s golden brown coloration visible above alongside internal softness confirming thorough cooking achieved throughout remaining portions underneath outer surface layer nicely as well!
Can I freeze leftovers?
Absolutely! Just wrap any remaining pieces securely preventing freezer burn then enjoy anytime desired later maintaining freshness while stored effectively preserving taste quality retained consistently across servings enjoyed freshly baked originally themselves!
Final Thoughts
This Classic Garlic Bread Focaccia offers both comfort and satisfaction every time you bake it—a wonderful companion alongside any meal or just enjoyed solo as-is right outta pan itself! There’s no doubt you’ll love making this one regularly as part of mealtime traditions around home gatherings moving forward together seamlessly thereafter over shared plates filled joyfully cherished among family friends alike celebrating good food memories created again anew!
Loved this recipe? Leave a comment below—I read every one! Rate it ⭐⭐⭐⭐⭐ and share it with a friend who’d love it.
Focus keyphrase: Classic Garlic Bread Focaccia
SEO title: Ultimate Focaccia Recipe: Perfectly Garlicky Every Time
Meta description: Make classic garlic bread focaccia effortlessly at home. Enjoy its fluffy texture paired with rich buttery garlic goodness today!
Focus keyphrase synonyms: classic focaccia recipe, how to make garlic bread focaccia, easy homemade focaccia with garlic, best garlic-infused bread recipe, simple garlicky focaccia at home, perfect fluffy bread pairings, foolproof focaccia techniques, traditional Italian-style garlic loafs

Classic Garlic Bread Focaccia
Indulge in the warm, garlicky aroma of Classic Garlic Bread Focaccia as it bakes to a golden perfection. The fluffy texture and rich buttery flavor create an irresistible combination that will have your taste buds dancing with joy. Customize this dish by adding your favorite toppings for an extra twist.
- Total Time: 40 minutes
- Yield: 12 servings
Ingredients
- 2 cups warm water
- 2 1/4 tsp active dry yeast
- 1 tsp granulated sugar
- 5 cups all-purpose flour
- 1 1/2 tbsp kosher salt
- 1/4 cup extra-virgin olive oil
- Extra olive oil for drizzling
- Several pinches flaky sea salt
- Chopped flat-leaf parsley for garnish
- Freshly grated parmigiano reggiano cheese to taste
- 4 tbsp salted butter
- 4 cloves garlic (minced or pressed)
Instructions
- In a bowl, combine warm water, sugar, and yeast. Stir gently and let sit until foamy, about 5–10 minutes; the mixture should bubble up nicely.
- In a separate large bowl, whisk together flour and kosher salt until lump-free for even distribution.
- Pour the activated yeast mixture into the flour mixture along with olive oil. Stir until no dry flour remains visible, forming a sticky dough.
- Cover the bowl with plastic wrap or a clean kitchen towel and let it rise in a warm place until doubled in size, about 1 hour; it should feel light and airy.
- After rising, punch down the dough on a floured surface to release air bubbles. Spread it onto your prepared baking sheet using oiled fingers and dimple it with your fingertips; drizzle more olive oil on top.
- Sprinkle flaky sea salt over everything and bake at 425°F (220°C) for 20–25 minutes until golden brown; enjoy the delightful aroma filling your kitchen.
- Prep Time: 15 minutes
- Cook Time: 25 minutes
- Category: Bread
- Method: Baking
- Cuisine: Italian